Lighting Techniques for Video Production
“I’m making a video, how do I light this thing?”
Lighting Techniques for Video Production
“I’m making a video, how do I light this thing?” We hear this all the time (at least for the sake of this article.) Don’t worry, lighting your video isn’t as intimidating as it may seem. The way you light your scenes can make a big difference in the quality of your final product, taking your films from amateurish to exceptional. With some practice and guidance, anyone can learn how to use various lighting setups to create stunning visuals and successful videos. Today we’ll share with you some essential lighting tips and tricks that can give any aspiring filmmaker an advantage over the competition. Whether you’re filming an interview for a corporate video or making your first student film, this beginners guide will help you with the basic principles of lighting and what you will need to get started. Here’s what we’ll be looking at:
- What is lighting for film and video? Seems basic but it’s important to understand why you need to learn about the lights.
- Understand the basics of lighting: Before you start experimenting with different lighting setups, it’s essential to understand the basics of lighting. Familiarize yourself with the three-point lighting technique, which uses a key light, fill light, and backlight to create a well-lit scene.
- Other important lighting techniques including natural light, practical light and other variations to give a unique look to your video production.
- Control the light: what are the three principals of light and how can you use them to create the look you want in your video.
What is cinematic lighting?
Cinematic lighting is an essential element of filmmaking which sets the mood, tone, and atmosphere of a scene. In film, the cinematography works with the lights and cameras to create the look and style of project. The delicate balance between light and shadows creates a captivating visual aesthetic that enhances the storytelling and evokes emotions in the viewer. By using techniques such as hard light to add drama or soft light to create a romantic atmosphere, filmmakers can manipulate our perceptions and transport us into their imaginative world. In essence, cinematic lighting is the enchanting element that breathes life into the screen.
Film Lighting Technique: The 3 Principles of Light
There are three key principles of lighting to keep in mind when filming your video: direction, intensity, and softness or hardness. By breaking your understanding of lighting down to these three principals, you’ll be able to approach your video project with a lot more comfort and confidence.
Direction
Direction refers to the placement of the light source and how it illuminates the subject. Example: for left of camera, from right of camera, from overhead, from the side.
Intensity
Intensity, on the other hand, is all about the brightness of the light and the effect it has on the mood and tone of the video.
Softness or hardness
This is more subjective, but it refers to the tone and overall vibe of your light source. We’ll get into that more below.
Film Lighting Techniques: Three-point Lighting
Before you can add your artistic style, let’s learn one of the most basic lighting concepts: the three-point lighting technique. This technique involves using three separate light sources to illuminate the subject in the frame. The first is the key light, which is positioned to one side of the subject and provides the majority of the illumination. The second light is the fill light, which helps to reduce shadows and is typically positioned opposite the key light. Finally, the third light source is the backlight, which is placed behind the subject and helps to create depth and separation from the background. When used properly, the three-point lighting technique can create a stunning visual effect that draws the viewer’s attention to the subject and adds depth to the overall image. Let’s look a little closer at these three lights.
Key Lighting
In the realm of visual production, key lighting is a vital component. Its primary purpose is to illuminate the subject in a scene, creating depth, contrast, and mood. This technique is pivotal in capturing the audience’s attention and directing their focus towards the main point of interest. Achieving effective key lighting requires a balance of artistic talent and technical knowledge, as it involves understanding the lighting equipment, the environment, and the director or photographer’s creative vision. Without proper key lighting, the production’s ability to captivate and inspire viewers would be severely limited.
Fill Lighting
In video production, just as in photography, understanding the concept of fill lighting is crucial. Essentially, it involves using a secondary light source to “fill in” the shadows and evenly spread light throughout a scene. Often, these shadows are caused by the primary light source and can cast an unflattering look on the subject’s face. By implementing a fill light, you can enhance the image’s quality by providing a soft, diffuse light source that adds dimension and depth to the subject’s features.
Backlighting
The three-point lighting technique is incomplete without the often neglected backlighting, which plays a crucial role in the quality of visual productions. It entails placing a light source behind the subject to create depth and separation from the background. You can use a backlight to either compliment what your key light and fill light are highlighting, or add some style to the secondary part of the scene. In most cases it’s important to ensure that the intensity of the backlight is balanced with the other lights in the setup, so as not to overpower the subject. Ultimately, backlighting is an essential element that adds professionalism and polish to the overall production.
Film Lighting Techniques: Additional Lighting Techniques
Once you understand the three-point lighting technique you can deviate from this set up and change up the look of your video to add some style or mood. Here are some other types of lighting.
Side Lighting
The use of side lighting in video production is a powerful tool for creating dynamic and captivating footage. Instead of illuminating your subject from the front, side lighting involves casting light from one side of the subject, resulting in striking contrast between light and shadow. This technique adds depth and texture to your shots, emphasizing the contours and shape of your subject. Side lighting is versatile and can be used to achieve a range of atmospheres, from moody to mysterious.
When to use side lighting?
Use side lighting when you want to add a dramatic effect to your scene, often referred to as chiaroscuro lighting.
Practical Lighting
Practical Lighting refers to the use of light from a source that also serves a function in the scene, such as a lamp, candle or even a computer screen. The use of practical lighting may take a little skill and practice as you may find your source doesn’t effectively light your subject. Additional lighting may be needed but you might need to be creative. Play around to see how you can make your additional lighting look like it’s coming from the TV.
When to use practical lighting?
Look to your script for when you need practical lights. When a lamp is needed or a television is used in your scene, you’ll need to think about the light that’s created.
Bounce Lighting
Bounce lighting involves using a surface to reflect light onto the subject indirectly, resulting in a natural and refined look that is perfect for interviews and other on-camera interactions. Bounce lighting is also an excellent way to shape and modify light to fit your vision without the need for elaborate setups that take up valuable time.
When to use bounce lighting
Bounce lighting can be used in any set up to create a less harsh lighting source or add some additional light to your background. You should always have some bounce boards handy. They’re a life saver!
Soft Lighting
The soft lighting can be used as your key, fill or background and involves using a more subtle light sources to create a gentle and flattering effect. This method is often chosen to create a relaxed and comfortable atmosphere, soften harsh lines and reduce shadows on the subject. Soft lighting can also help to highlight the emotions and mood of the scene, resulting in a more enjoyable viewing experience. In video production, lighting is critical, and soft lighting has become increasingly popular among filmmakers and video producers because of its ability to create a gentle and calming effect.
When to use soft lighting
Consider using soft lighting when lighting you’re using seems unflattering or you’re seeing too much harsh shadow on your subject. It’ll look great for interviews or anything you want to give a friendly and gentle feel.
Hard Lighting
In contrast, hard light will produce sharp, defined shadows with distinct edges and highlight wrinkles or ruggedness in your subject. This is great if you want to add mood for a dramatic genre, but it might not look right for every video. Hard lighting can be achieved by using direct sunlight or a powerful light source.
When to use hard lighting
Hard light is great when you want texture and realism in your production.
High Key Lighting
High key lighting is a popular technique in video production, which helps to produce a bright and lively atmosphere. The approach involves increasing the light and exposure levels to minimize shadows and create a bright and airy ambiance. High key lighting is often used in music videos, commercials, and other upbeat videos where the goal is to create a positive and energetic mood. Additionally, this technique is great for creating a classic look in black and white films.
When to use high key lighting
If you are looking for a bright, almost dreamlike scene, consider using a high key lighting technique.
Low Key Lighting
As you may have guessed, low key lighting is the opposite of high key lighting, where minimal light and the use of shadows create a moody and dramatic effect. This can draw the viewer’s attention to specific parts of the scene. This style of lighting is achieved by utilizing a restricted number of light sources, emphasizing the shape of the subject or conveying a sense of tension and mystery. Although it is typically used in film noir, horror, or mystery genres, it can be appropriate for any video production that requires a dark and ominous ambiance. You may need to further play with the feel of your scene in post-production editing to achieve the look you want.
When to use low key lighting
Low key lighting is great for horror or noir genres but can be used to give an interesting look to any video production.
Motivated Lighting
Filmmakers use motivated lighting in video production to produce realistic lighting that elevates the story and enriches the visual storytelling. This technique involves replicating natural light sources found within a scene, such as lamps, moonlight or lighting in a car. It can also be used to enhance the practical lighting used within a scene. Though motivated lighting may require more time and effort than standard lighting setups, it can be an invaluable tool for bringing realism to your scenes.
When to use motivated lighting
Use motivated light as they’re needed in your script and story. Just like with practical lighting, there’s no one way to add motivated light so you can be creative.
Ambient Lighting
Ambient light refers to the natural or pre-existing light in a given space, which can be adjusted to create a particular mood or atmosphere. When filming your video outside during the day, the use of the suns natural light can cut back on expenses and time and enhance the quality of your visuals. For tips on using natural lighting for your video productions check out this article. Ambient light can also be artificial lighting that exists in your location such as a street lamp, neon sign or other background lighting that can be seen in your frame.
When to use ambient lighting
Using ambient light or natural lighting outside during the day can be a great way to save money or setup time/energy. Always scout your areas; if you like the way a light source looks, use it!

Using Lighting Techniques for Corporate videos and Interviews
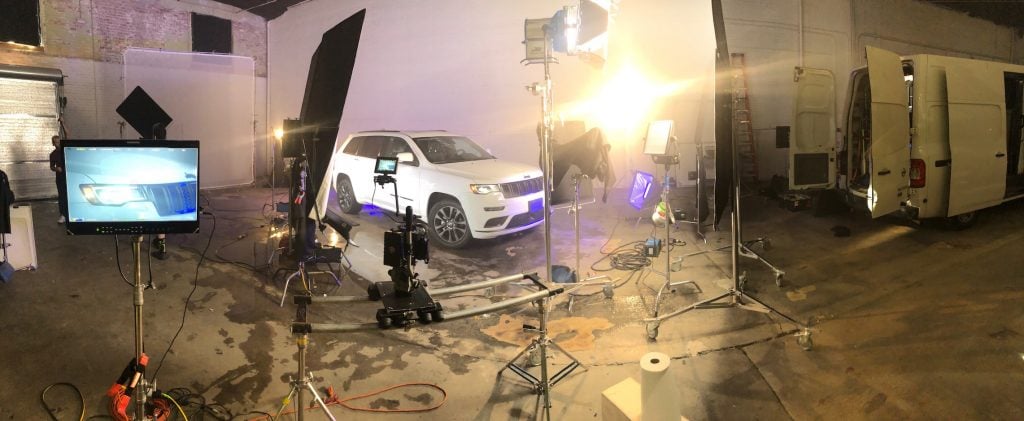
We’ve been talking a lot about using lighting techniques to enhance your cinematic projects, but what if you’re looking to set up lighting for a corporate video or interview. The same rules we’ve gone over above can be used for any type of video project, you can adjust the three lighting principles (direction, intensity, softness/hardness) to fit your needs. The three-point lighting technique with your key light, fill light and backlighting is still a simple and trusted method for lighting your subjects. Most of the time the important thing is to make your interviewee or scene look great, but if you want to add some style, let the elements above be your guide.
Lighting for video production doesn’t need to be difficult
When it comes down to it, the main function of your lighting set up is to light what your camera is shooting. Make that your first priority and then add on from there. Use the three-point lighting technique and then adjust your direction, intensity and softness or hardness to create the style you want for your video or film. Just like with every other element of video production, the more you do it the more comfortable with it you’ll be and you’ll find what works best for you and your team.
If you need help with your lighting or any other part of you next video project, please contact us here.